
How to Build a Slatted Fence
Save money and get a premium look using affordable roofing battens
Save 50-70%
Pre-made slatted panels cost £80-150 each. Build your own for a fraction of the price using roofing battens at £2-4 per length.
Premium Look
Contemporary horizontal slat design that looks stunning and adds value to your property. Perfect backdrop for modern outdoor living spaces.
Total Flexibility
Custom heights, any length, adjust slat spacing, and even "overboard" existing fences. Impossible with fixed-size pre-made panels.
Calculate Your Materials
Use our free calculator to work out exactly how many battens, posts, and postcrete you need.
Why Build Your Own Slatted Fence?
Slatted fencing (also called contemporary or hit and miss fencing) has become hugely popular for modern gardens. The clean horizontal lines create a stylish backdrop for outdoor living spaces, and the semi-open design allows light and air through while still providing privacy.
The problem? Pre-made slatted fence panels are expensive - often £80-150 per 1.8m panel. For a typical garden, you could be looking at £500-1000+ just for panels, before posts and installation.
The solution is simple: build it yourself using roofing battens. At just £2-4 per 3.6m length, you can create the same look for a fraction of the cost - and with complete flexibility over dimensions and style.
Cost Comparison: DIY vs Pre-Made Panels
| Item | Pre-Made Panels | DIY (Battens) |
|---|---|---|
| Pre-made slatted fence panel (1.8m x 1.8m) | £80-150 | - |
| Roofing battens (per 3.6m length) | - | £2-4 |
| Fence post (100x100mm x 2.4m) | £12-18 | £12-18 |
| Postcrete (20kg bag) | £5-7 | £5-7 |
| Total for 10m fence (approx.) | £500-900 | £150-250 |
Step-by-Step Guide
Set Your Posts
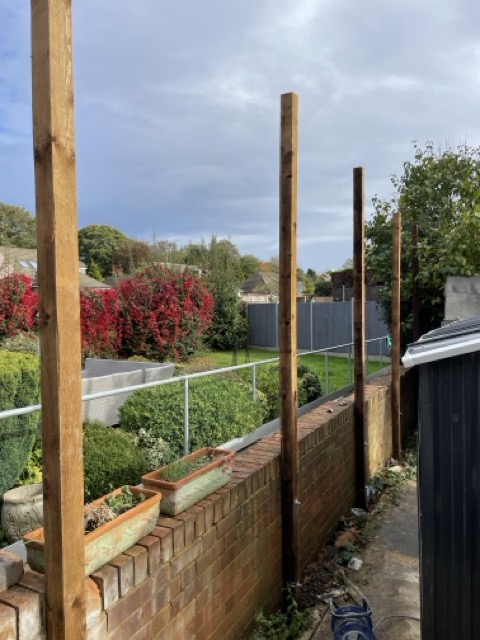
Mark out your post positions at 1.8m intervals (or 1.5m for taller fences in exposed locations). Posts can be:
- Concreted into the ground (dig 450mm deep)
- Bolted to an existing wall (as shown)
- Fixed to post supports on concrete
Use 100x100mm posts for fences over 1.5m, or 75x75mm for shorter fences. Always check posts are plumb with a spirit level.
Add Horizontal Rails (Optional)
Fix horizontal rails between the posts to support the slats. Use 2 rails for fences up to 1.5m, or 3 rails for taller fences. You can use the same battens for rails, or heavier timber like 47x50mm for extra strength.
Alternatively, you can fix slats directly to the posts if your post spacing is 1.8m or less - the battens are strong enough to span this distance.
Fix the Slats (or Overboard an Existing Fence)
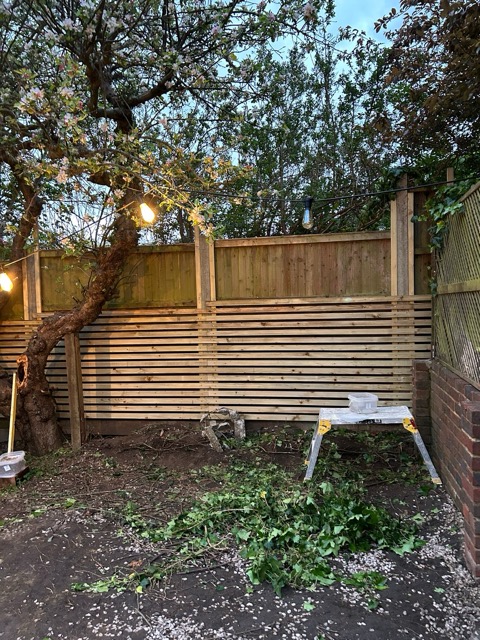
Pro tip: Overboarding
Don't want to remove your existing fence? Simply fix posts in front of or behind it, and add slats above. This photo shows a slatted extension added on top of an existing closeboard fence - a great way to add height and a contemporary look without starting from scratch.
Use a spacer (a piece of batten works perfectly) to keep gaps consistent. For hit and miss style, use a 50mm gap. For full privacy, butt the slats together with no gap.
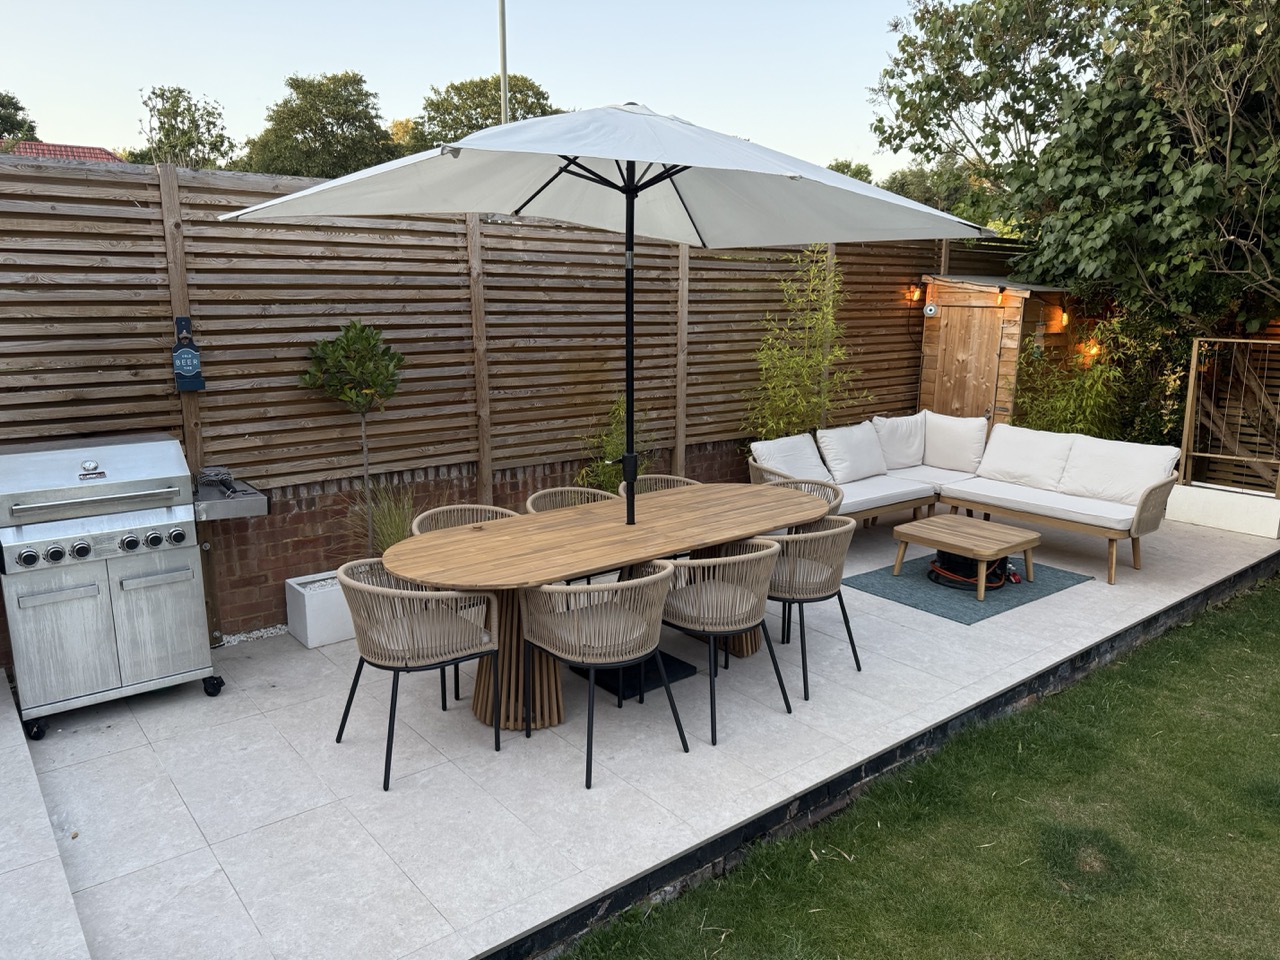
The Finished Result
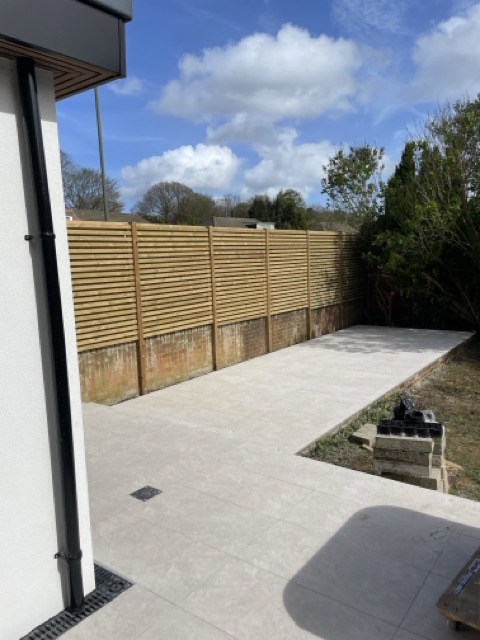
Your finished fence will look like a professional installation costing three times as much. The natural timber will weather to a silvery grey over time, or you can apply fence stain for a different colour.
The horizontal lines create a stunning backdrop for planting and outdoor furniture, making your garden feel more spacious and contemporary.
Slatted Fence Styles
Single Sided
Slats on one side with gaps between. Allows light and air through while providing partial screening. Most popular choice for a modern look.
Hit & Miss (Double Sided)
Slats on both sides, offset to cover the gaps. Best of both worlds - full privacy with excellent airflow.
Frequently Asked Questions
Building your own slatted fence using roofing battens typically costs £15-25 per linear metre for materials (battens, posts, postcrete), compared to £60-100+ per metre for pre-made slatted fence panels. For a 10m fence, you could save £400-750 by doing it yourself.
Treated roofing battens (50x25mm) are ideal - they're already pressure-treated for outdoor use, cost-effective, and the 50mm width creates attractive proportions. For a more premium look, use 75x25mm PAR (planed all round) timber. Always use treated fence posts (100x100mm or 75x75mm depending on fence height).
For hit and miss fencing, a gap equal to the slat width (50mm) is standard. Smaller gaps (25-40mm) provide more privacy, while larger gaps allow more light. For single-sided slatted fences where you want full privacy, leave no gap between slats.
You can either: (1) Use no gaps between slats for full privacy, (2) Build a double-sided hit and miss fence where slats on each side are offset to cover the gaps, or (3) Use wider slats with narrower gaps. Double-sided hit and miss provides privacy while still allowing airflow.
"Overboarding" is a popular technique where you fix new posts to an existing wall or fence and add slats above. This is great for adding height and privacy to an existing closeboard fence, as shown in our guide photos. Just ensure the base structure can support the additional weight and wind load.
Standard spacing is 1.8m (6ft) which provides good stability. For taller fences (over 1.5m) or exposed/windy locations, reduce to 1.5m spacing. In sheltered areas with shorter fences, you can extend to 2.4m but this is not recommended for most situations.
Materials You'll Need
- Roofing battens 50x25mm
Treated, 3.6m lengths
- Fence posts
100x100mm or 75x75mm treated
- Postcrete
2 bags per post
- Stainless steel screws
4x40mm or 4x50mm
Tools Required
- Drill/driver
- Spirit level
- Tape measure
- Saw (mitre or circular)
- String line
- Post hole digger (if concreting)
Top Tips
- Use a spacer
Cut a piece of batten to your gap size and use it to ensure consistent spacing.
- Pre-drill if needed
Pre-drilling near the ends of battens prevents splitting.
- Start from the bottom
Work your way up - it's easier to ensure the top is level.
- Allow for drainage
Leave a small gap at the bottom so water doesn't pool.
Related Materials
Compare prices on the materials you'll need for your slatted fence project.